29 Apr 2017
This will be a very negative post so I want to start off with saying that I
love Visual Studio, it’s my favorite IDE for C++ and C# development. With that
said the upgrade to VS2017 has been less than smooth.
Moving to vswhere
I agree that Visual Studio has outgrown the old environment variable approach, however
the implementation is lacking.
What went wrong?
Not shipping the tooling in the box makes migrations a lot more painful than they should be.
The user now has to download the tool in the buildsystem, likely hosting a copy somewhere to
avoid Github issues causing builds to fail. This in turn means the user has to keep their
local copy updated with new releases of the tool which doesn’t track the Visual Studio release
schedule.
Alternatively the user can build the tool locally but then the issue instead becomes integrating
that build into the system and keeping a local fork of the git repository.
Now you might say, use the Powershell module! That has all of the same drawbacks mentioned above.
What do I want?
Ship vswhere and the Powershell module in the box, update it through Visual Studio or keep it in
sync with the larger update releases. Put it in the PATH or let me find it using an environment
variable.
This was a good idea, I can keep back compat without having a full VS2015 install taking
up disk space.
What went wrong?
This doesn’t actually include the tools needed to actually use it. Trying to call vcvarsall.bat
it spits out the help usage message. The script actually tries to find the Microsoft C++ Build Tools 2015
which aren’t included in the install. Until these are installed vcvarsall.bat fails and does nothing.
What do I want?
If I select to install this component it should actually work and not require a separate download.
Outro
This is just two of the issues I’ve come across so far. There’s plenty more but it requires some more
verification to make sure it’s not just me doing stupid things.
29 Apr 2017
This will be a very negative post so I want to start off with saying that I
love Visual Studio, it’s my favorite IDE for C++ and C# development. With that
said the upgrade to VS2017 has been less than smooth.
Installer
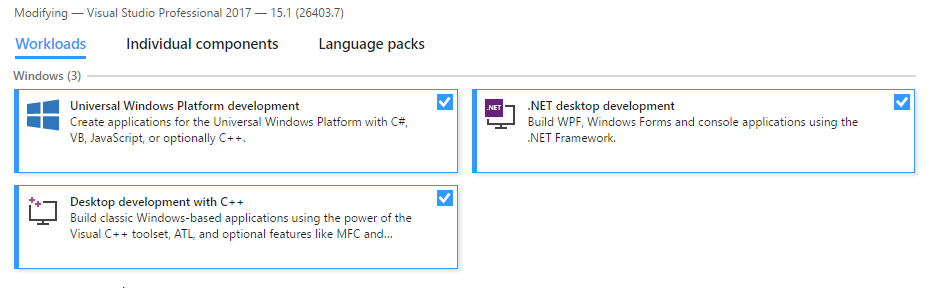
Lets try to set up Visual Studio for C++ Universal Windows Platform development.
First we select the workload that looks like what we want
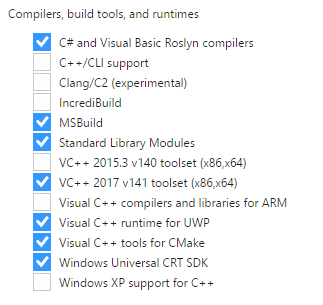
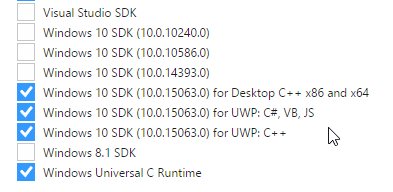
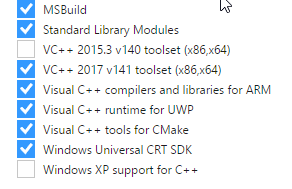
Next we make sure to check the individual components that seems related to what we need
Now we should be good to go, let’s open Visual Studio and try to create a new project
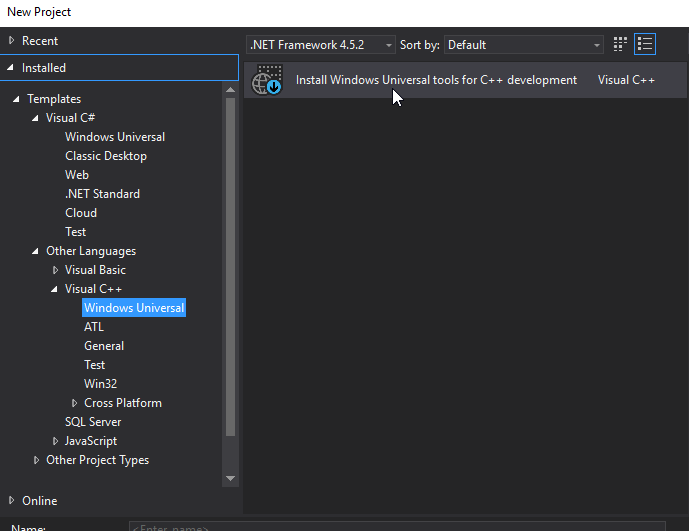
Well that didn’t go as expected. You would think that installing the workload Universal Windows Platform Development
would install the bits needed to actually create a project.
Right, what happens if we install the suggested bits? Apparently it suggest installing the ARM tooling.
Can we create a project now? Lets try it out and see what happens

Success! But why oh why did this not just work from the beginning?
I picked a workload and it seems quite reasonable to expect that I can actually use that workload once it’s installed.
04 Feb 2017
I was trying to find a simple solution to test my Logstash filter pipeline
but the blogs and documentation seemed to cover older versions and/or focus
on Ruby. No hard feelings against Ruby but we’re not a Ruby shop so this got me thinking,
how hard can it be? Well it turns out not hard at all.
The basis of my solution is language and framework agnostic but the examples will use
Node and the Jest test suite.
We’ll use the following project structure for the examples
| - filters // Logstash filters
  | - 00-test-input.conf
  | - ** // your filters goes here
  | - 99-test-output.conf
| - input // Logstash test input
  | - test1.json
  | - test2.json
| - output // where logstash will store the files
| - tests // Jest test suite
| - docker // files used to build our container
  | - Dockerfile
  | - run-filter.sh
Docker container
Let’s start with building the container we will use to do our Logstash processing.
Piping input into the stdin plugin let’s us start Logstash and have it shut down
when it’s processed all input so there’s no need to manage it’s lifetime.
FROM logstash
COPY run-filter.sh /
VOLUME /test
ENTRYPOINT ["/run-filter.sh"]
This is quite basic, we copy our script and set it as the entrypoint so that we can
use the container as a regular command.
The script we’re using is really simple and could possibly be specified directly
in the Dockerfile but I wasn’t sure about the pipe and didn’t want to spend time testing.
#!/bin/bash
cat /test/input/*.json | /docker-entrypoint.sh -f /test/filters/
docker-entrypoint.sh is provided by the logstash container so we just call that in the same way
while piping our input into it.
Build like so docker build -t paxxi/logstash-test .
Once we have built this container we can invoke it like docker run -it --rm -v $PWD:/test paxxi/logstash-test
Logstash filters
Our container isn’t all that useful yet, it will happily pipe whatever we have in our input folder
into Logstash but there’s no output yet.
Let’s fix this with a test input config and a test output config. We’ll start with the input
input {
  stdin { codec => json }
}
Simple enough, we expect json piped to stdin, remember to have a blank line at the end of each json file.
Next up our output config
output {
  file {
    codec => json
    path => "/test/output/%{[test_name]}"
  }
}
Also quite straight forward, we write each event to a file named after the key test_name in our inputs.
Probably a bit of a hack but it lets us easily separate each test result into it’s own file for later processing.
How you decide to gather your test inputs is up to you. I decided to output a few events from filebeat and then use
that JSON as a template and replacing the log key with the different messages.
The actual tests
We finally have all the pieces in place to start working on the tests, that’s what we came for :)
Here I’m using Nodejs and Jest but any language that can read JSON can be
used.
A simple test can look like this
const fs = require('fs');

let result;
beforeAll(() => result = JSON.parse(fs.readFileSync('../output/test1.json')));

test('service_name should be set and correct', () => {
  expect(result.service_name).toBe("traefik");
});
And that’s all there’s to it, now we have a test pipeline that we can build upon
and extend.
End result
We can run our tests with two steps (obviously this can be integrated but personally it’s running in Jenkins so this is good enough)
docker run -it --rm -v $PWD:/test paxxi/logstash-test
cd tests && jest
Happy testing!